!!! My website has
moved: please update your bookmarks to debunix.net !!!
Live food
cultures II
I have acquired quite a few different cultures gradually,
and some
work well for me and some don't. These are the ones I have kept going,
some better than others. My favorites are the BBS, microworms,
and grindals, because these are easiest for me, and I feed them to my
fish daily. In order of size, smallest to largest, they are:
Vinegar Eels
Microworms
Baby Brine Shrimp
Grindal worms
Grindal worms on green scrub pads
Daphnia
Daphnia vs Moina
Confused flour
beetles
White worms
Livebearer fry
Red Wigglers
Snails
I discuss my experiences with each below, and I've included some
more web resources here. I
also have some notes from fellow MASI and SLAKA member Jack Heller, a
master breeder of killifish, on how he does some of his live food
cultures, including paramecia, white worms, and fruit flies, here.
And I continue to envy Charles Harrison's cool basement that
allows him to keep thriving cultures of white worms year round--see his
setup for those here.
For truly in depth information on culturing these and many other live
foods, there is now a terrific, up-to-date resource by my friend Mike
Hellweg, a master fish breeder and fish keeper who has just written a book on the subject. You can reach him here to find out how to get a copy of his Culturing Live Foods.
I've learned a bunch from my copy already, and am going to change
some of my formulas to reflect this new information. He discusses
all of the foods I have here in more depth, plus many smaller, larger,
and some just plain finickier than I have been able to keep going.
This book is also a primer on spawning fish--just because the
discussion is framed as culturing them as feeders for other fish
doesn't mean the tips and strategies mentioned are any less applicable
to breeding a wide variety of desireable fish. That's a lot of
great info for one book.
Vinegar Eels
The newest addition to my collection of critter cultures, these are
supposed to be small enough for even tiny rainbowfish fry. You
can't really see the individual worms without magnification, but they
make the water cloudy when they're doing well. They also have the
advantage of swimming throughout the water column, which is important
for those small fry that live near the surface. But
although
these are supposed to be very
easy to keep--able to survive long
periods of neglect--but they can be killed. They are called
"vinegar" eels but they prefer a 1:1 dilution of vinegar (I use apple
cider vinegar and tap water). They do well with some peeled apple
slices (to avoid bad effects from any sprays on the skin of the apple,
which can kill them) or a teaspoon of applesauce in a pint of culture,
with a small spoonful of sugar stirred in. They're very easy to
keep alive, although they can be killed by (1) unpeeled apples (2)
drying up of the culture (3) mold on an overfed culture (and you can
probably find a few more if you're creative).
Though to the naked eye they appear mostly like specks of dust in the
liquid, up close they're proper worms indeed:
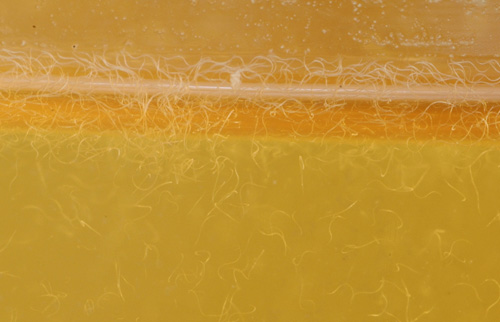
Here they are in their new culture with some fresh cut peeled apples:
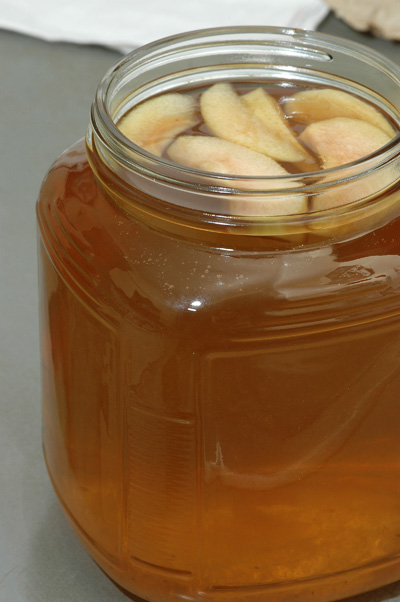
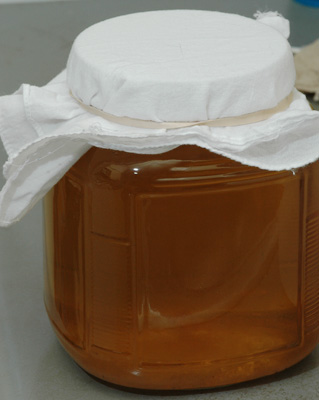
And the apples will soon break down into mush like that on the bottom
of the jar. They will stay in this wide-mouthed jar, coverted
with a bit of fabric to keep out the fruit flies:
Jack Heller likes to harvest his by pouring them through a coffee
filter, flipping the filter over into a dish of water, so that the eels
fall into the water, and uses a dropper to feed them
to fry. Another technique is to use a long necked bottle, fill it
with the eel culture partway up the neck, then stuff in a piece of
filter floss, cover with water, and wait a few minutes for the eels to
migrate up into the water (this keeps vinegar out of the tank, but
avoids the need for filters). I will try out both harvest
techniques if I can get them established.
Fortunately, there seem to be plenty of infusoria in
my planted tanks to get the
littlest fish started just fine; I've even had a little pseudomugil
rainbowfish appear spontaneously in one of them.
Microworms and Walter worms
Update coming soon....after reading a very interesting
article about these in the Journal of the American Killifish
Association, I tried these on potato flakes for the first time a few
weeks ago, and they're doing great. I am quite impressed, and all
the new cultures I've started are now on potato flakes.
These are very small, but at 1-2 mm long, are visible as tiny threads
in the water when you feed them to your tanks. The fry of most
fish can take these soon after hatching: they're considerably
smaller in diameter than even newly hatched baby brine shrimp.
They do fall rather quickly to the bottom of the tank, though, so top
swimming fry may not get enough of them. I've had two different
varieties that are available locally, and now only keep so-called
"Walter worms". These are a type of microworm that spend more
time in the water column before they sink than do regular microworms
(click here to see an experimental
demonstration of the difference).
I cultivate these on a mix I learned from Al Andersen's
talk on live foods at the MASI show in 2003: gerber instant
oatmeal or mixed grain cereal plus a bit of brewers yeast plus a little
instant dried yeast (about a pinch of instant yeast plus a tablespoon
of brewers yeast to a cup of cereal). I think the worms are
supposed to eat the live (activated)
yeast, which feeds on the cereal and brewers' yeast. I make
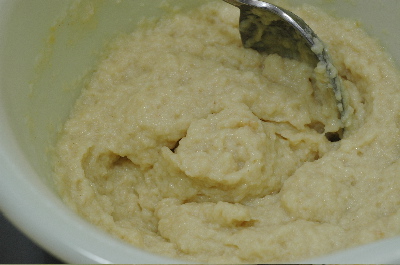
this up in bulk and just add equal parts mix and
water to a clean dish, so that it is a thick paste like this:
I place a dollop of this in a small plastic container, and add a few
drops of liquid from an earlier culture. As the culture matures,
it will get thinner and darker , and that is normal.
After
reading a very interesting
article about these in the Journal of the American Killifish
Association, I tried these on potato flakes for the first time a few
weeks ago, and they worked great, but the smell got nastier quickly, so
I have gone back to the baby cereal. I now do it simpler and add
the cereal mix to the container and water to that, without using an
intermediate step of mixing it up in bulk in the bowl.
After about a few days to a week, the worms start crawling up the side
of the
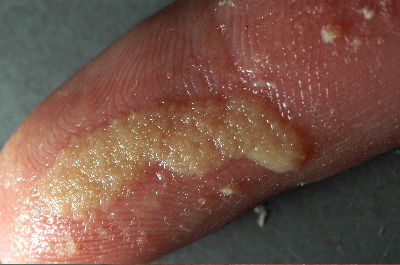
containers. The cultures are harvested daily by wiping
the worms off the side of the container with a finger and kept going
until the yields
drop, usually for about 3 weeks. I looked through the cheap
disposable containers at the grocery store to find some that I could
stack in a small container, because the easily harvestable worms come
from the sides of the container, as here above
the red line:
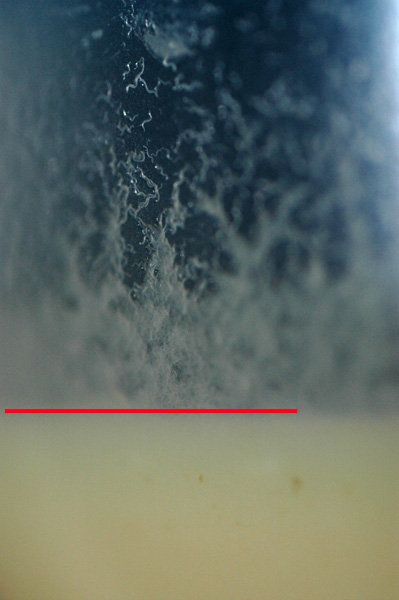
where I rub them off daily with my finger to feed the fish (you can use
a rubber scraper or a popsicle stick for this part if you're squeamish,
or your hands are dirty):
There are more worms living in the lower part of the culture, but
harvesting them leads to putting a lot of cereal debris in my
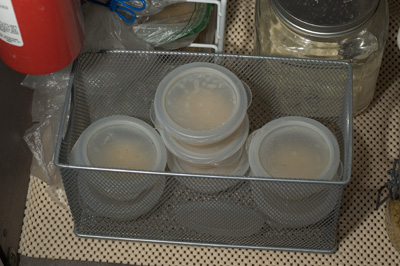
tanks. So I prefer to use multiple small containers, here trying
to get the maximum amount of side-wall surface for harvesting.
Yogurt containers and margerine tubs are often used, but I found some
little disposable cups that fit stacked in a box so they're easy to
handle. I poke holes in the lid with a pushpin for air exchange,
but be sure the holes are small or fruit flies can find their way in
(very very messy). These worms do fine, by the way, whether they
are kept in a light or a dark place.
After swiping the wall of the container, I swirl my finger in a clean
cup of water. Then I rinse the worms through a brine shrimp next
to get rid of the cloudy cereal debris. I swirl
the containers daily to recoat the sides of the container after I take
off
the worms, which seems to encourage the worms to climb up the sides for
easy harvest. When the culture turns darker and fewer worms come
out, despite being stirred/swirled daily, I dump it and start a new
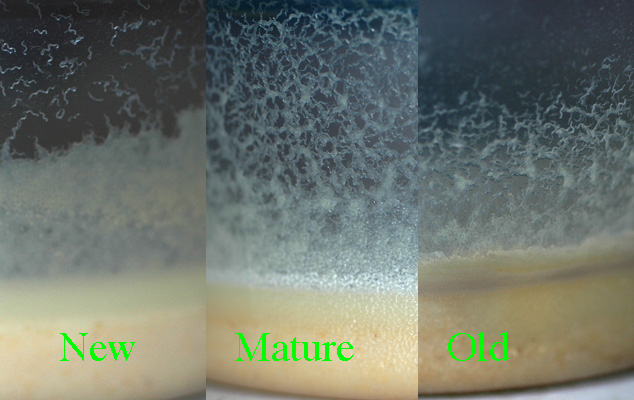
one, usually every 2-3 weeks. There are typically 2-3 fresh, 2-3
medium, and 2-3 older cultures going at any one time, and still I don't
get very many worms at once, but fortunately the little fish that need
these don't need a lot of them to grow .
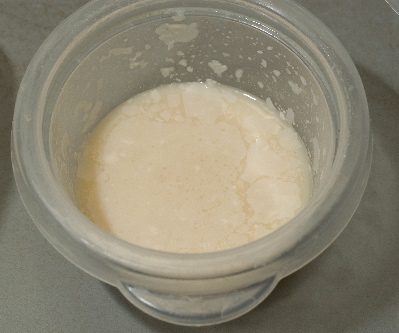
Sometimes a little skin of yeast or bacteria grows on top of the
culture, but does not harm the worms, and the flakes of it that end up
floating on top of the water are easily poured off before the worms are
poured into the net for rinsing:
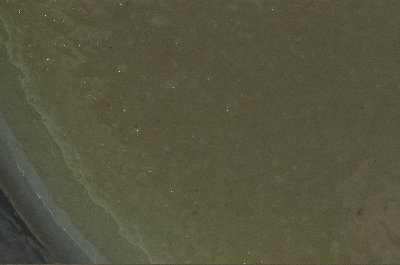
If you don't see lots of worms on the side of the container, don't
despair. They're probably still in there. If you swirl the
culture and look at the surface closely, it should
look like it is moving or bubbling, like this:
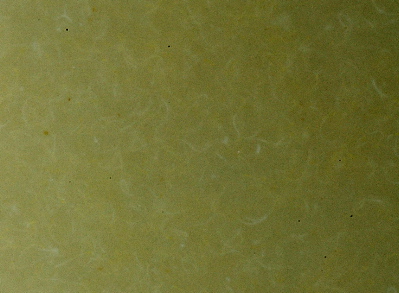
Looking a little closer up (this requires a magnifier) you start to see
the individual worms swimming at the surface:
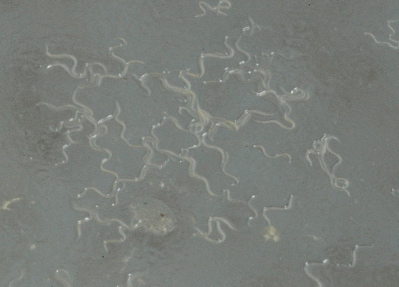
And here they are climbing up the wall of the culture:
Jack noted that stirring some puffed rice cereal (not rice krispies,
but puffed rice) into an older microworm culture can keep it going for
weeks more.
BBS
Newly hatched baby brine shrimp are a favorite not only of small fry,
but of most fish up to a couple of inches long. They're active
swimmers, dispersing throughout the water column, and survive for hours
after being added to a tank. I do these differently than most,
because I don't use air pumps at all
in my fishroom (which is my living room, and the live food area is my
kitchen too). I hate the noise they make (yes, I know the new
linear piston pumps are very very quiet, but even so....).

I hatch brine shrimp eggs daily in a 2 liter flask, set on a magnetic
stirplate. Each night I add 1L of room-temperature tapwater to
the flask and 1/2-1 tsp brine shrimp eggs (depending on how many small
fish there are to feed). 2-3 drops of bleach may be added per
liter to prevent the growth of unpleasant bacteria,
and since bleach is used to dechorionate the eggs to increase hatching,
I suspect it may help hatch rates used like this as well. The
flask is set to stirring overnight
on medium speed, enough to see a little whirlpool vortex in the middle
of the liquid. Stirring needs to be fairly vigorous for
good aeration.

The next morning I add about 1 1/4 ounces of
pickling salt. I keep the salt in a jar next to the stirplate and
flask, and keep a scoop in it that is just the right capacity.
It's all about making it easy to remember even when I am sleepy stupid
in the morning.
Some people think the type of salt makes a difference: most use
non-iodized salt, some people like rock salt or road salt, and Jack
Heller even adds a bit of epsom salts to his along with the rock
salt. I use the pickling salt because the three-pound box is a
convenient size for me to store.
At night I pour the contents into a 1 liter fat-separator measuring cup
(the spout comes
off the bottom) and leave it sit for a few minutes while I harvest the
microworms and feed the grindals.
 http://debunix.net/fish/CharlesLiveFoodCulture.html#CharlesShrimpHatchery
Then I pour off the hatched
BBS from the bottom and leave the top-floating unhatched and empty
shells
in the separator. And I set up a new flask for the next night's
BBS. I use two flasks in rotation to let one dry while the other
is in use, and this keeps down the smell. When they get a nasty
film on the sides, a dilute bleach solution and rub with a bottle
scrubber will clear it right up.
I don't know what my hatch percentage is, but I get reliable
BBS production on a 24hr rotation and that works for me and my
fish. I may also be feeding some bad eggs, that hydrate but don't
hatch, and sink; this reportedly can make fish sick. I haven't
noticed any problems with my fish. Overfeeding BBS encourages the
proliferation of hydra. This has given rise to the idea that
hydra actually exist in the cans of brine eggs, and hatch out with
them, but to the best of my knowledge and that of my sources this is
not the case. The hydra may come along with live plants or fish
or gravel, and the BBS are a terrific food for them, so overfeeding
encourages the proliferation of hydra that were already in your
tanks. BTW, a bit of fluke tabs quickly takes care of the hydra,
so they don't harass or kill your small fry that are supposed to be
eating the BBS.
More common setups to hatch BBS are designed to use airstones for
vigorous aeration, and are setup so you can
turn the air off, let the hatched nauplii settle to the bottom of the
culture, then pour off directly from the bottom, or use a baster to
suck them up without bringing along the empty floaters. They are
also drawn to light, so a setup incorporating a light at the bottom
will help separate them from their shells. I used to keep a light
on over the culture 24/7, but have since discovered no change in the
hatching rates without it. I have some pictures of Charles
Harrison's brine shrimp hatchery here.
Grindal
Worms
I love the grindals because they like normal room
temperatures, unlike white worms that need it cool (I hate the idea of
running even a small refrigerator just to keep it cool for the worms to
feed the fish). I
grow them in small plastic boxes, as shallow as I can get (you're
really growing them only on the top surface, so deeper boxes just take
up more
room without providing more worms). I have a small rack
(purchased with some little "drawers" from an office supply store,
drawers discarded, that allows me to stack several in a small space)
that holds several of them under the sink (they prefer the dark), and
can stack more on top as
needed, giving me enough growing surface to produce more grindals than
all my fish can eat.

Each box is filled with half an inch to an inch of Magic Worm Bedding (Magic Products Inc),
kept quite moist. I use this bedding for my worm compost bin,
because it seems to keep the redworms happier, so I always have it on
hand. Other people use various soil or peat mixes, or go dirtless
with sponges or green plastic scrubbies. I trim the lids of the
boxes off on two sides
so they fit inset into the box, on top of the worms and their food, but
cover most of the box. The more of the surface you cover with the
lid, the more of it you can actively use for harvest. The edges
of the lid that remain provide a convenient handle, and the plastic lid is
easier and safer than the piece of glass that is often recommended:

The boxes are loosely wrapped in a plastic bag to keep out fruit flies

Each evening I take off the lid,
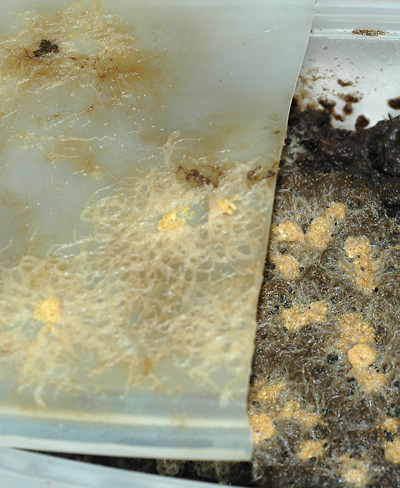
return any visible pellets of catfood (like this in the middle of this
closeup) to the box

and wipe the worms off into a dish of tap water:
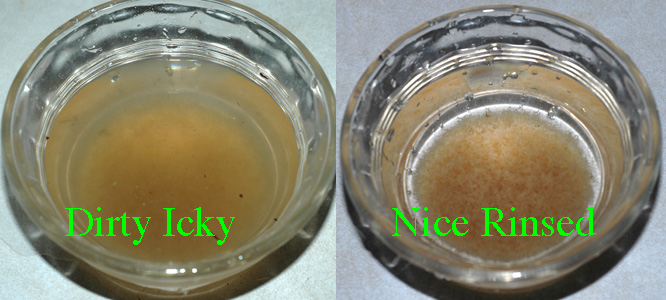
The worms are swirled around and allowed to settle, the water poured
off, and new water added, and rinsed this way several times while I'm
also thawing the frozen food and preparing the brine shrimp and
microworms. By the time I'm done they are much cleaner and ready
to be dropped into the tank from my miniature baster. The box of
worms gets a few fresh pellets of cat kibble. I started with
Science Diet
feline
maintainance light, since that's what I fed to the cat, but I have
recently learned that kitten food may be better because it has more
vitamin C that will eventually get passed through to the fish.
However, the Science Diet kitten food molded too easily, and the worms
did not seem to swarm over it as readily, so I have switched to Purina Kitten Chow, which seems to work a little better.
Here is the fed culture ready to be covered, wrapped, and put away:
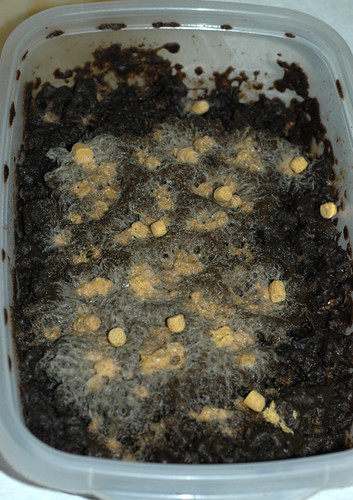
Alternative foods for grindals include trout chow, other
fish food, baby cereal, or soaked slices of bread: they're really
not very picky. But the kibble is clean, easy to use, keeps them
up on the surface for easy harvest, and resists mold better than baby
cereal.
All my fish love grindals, and I love getting a couple of tablespoons
of live
food daily from a bit of cat
food and a
small investment in
space.
And I have not had to restart the cultures very often--they've gone
about a year between restarts; if I add too much food and
some molds (rare but it does happen), I remove the moldy bit and the
culture goes on; if it gets
a little too wet, a few days with the bag loosened dries it out a bit;
if
I leave on vacation I just let them go in their bags until I get back
(refrigeration was a bad idea: the worms died and it was
nasty).
I recently discovered what seems to be a really good way to start new
cultures: I take the cleaned, rinsed worms when I have some
extra, pull them up in the baster, and let them sit in the baster until
they sink into a sludge about to fall out of the tip. I put a few
drops of this concentrated mass of worms over a fresh piece of kibble
in a new container of fresh, damp, worm bedding. There is a good
ratio of worm to food right away, so the culture starts without a lot
of moldy kibble or hungry worms trying to find their way to the new
food.
Plastic shoeboxes are also popular to keep grindals, but beware that
loose-fitting lids
invite fruit flies. Another unwelcome visitor to grindal
and white worm cultures are springtails, tiny little bugs that look
like little white specks on the surface of the culture media.
When they invaded my white worms (possibly coming from a bag of
poor-quality peat I used for the bedding mix), they quickly took it
over, despite attempts to flood and freeze the culture to kill them off
(but spare the worms). With the grindals, I found that they
seemed to outcompete the springtails, without any special
treatment. I saw a few springtails, then a few more, then they
gradually disappeared over a few weeks.
Grindals on scrubber pads
After an outbreak of mites in my grindals, which recurred after I
subcultured them very carefully trying to avoid carrying along any
worms, I tried some "soiless" cultures on green scrubber pads.
These are now going great guns and the mites have not entirely
vanished, but are remaining at a low, manageable level. I also
switched from using plastic bags to an old pillow case to seal out the
fruit flies, which also is working quite well. These
cultures are much slower to get established, and respond to
overfeeding with impressively nasty molds if you're too
enthusiastic--daily feedings are best, just enough for the worms to eat
within 24 hours.
Here is the stack o'cultures in the pillowcase:
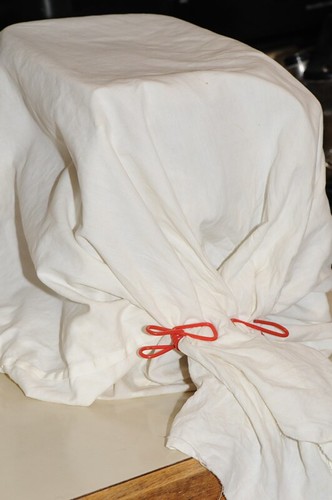
And what it looks like inside:

Baring the worms:

And this is what the culture looks about 8 hours after feeding:

And the worms on the lid are ready for harvesting with a swipe of the finger:

The goop at the bottom may be where there are freshly hatched worms, so maybe it shouldn't be thrown out:

And you can make a little more of that by periodically rinsing the culture pad with a little tap water (not dechlorinated).
This is the dense, well-established culture:

And this is a new culture, only about 2-3 weeks old, given new blobs of
worms and dampened kibble, little by little, only feeding as much as it
will eat overnight. It takes many weeks to build up to a
well-established culture like the one above.

I have not been raising them on the pads for that long--about 18
months now--and don't have clear criteria for splitting or renewing
cultures. Gradually increasing the number of kibbles fed
daily--again, only as much as the worms will eat--is a very slow but
safe way to get them to the size and productivity of the very well
established culture shown above.
I think I got much
faster establishment recently by a different technique, and I will try
this again in the future. The cultures are generally 3-5 pads
thick, and when my best-established culture got overwatered, and
started to smell of decaying worms, I removed a couple of the middle
pads, rinsed them under the tap (gently, trying to remove some of the
foul smelling muck but not let all the enmeshed worms escape), and
switched it out with a clean pad from the just-started cultures.
All three cultures did well after this.
Overwatering is a
problem with these cultures, as is drying out on hot dry days. I
generally add a little water to the bottom of the cultures daily after
I harvest and feed them--just enough to keep the bottom quite wet and
have a little water that will puddle if I tip the culture on end a bit,
but not enough to immerse the entire bottom of the culture box in
water. If they do get overwatered and a little moldy, pour
out some of the excess from the bottom of the box. Feed very
sparingly, and give them time to come back. They have come back amazingly well if I give them time.
White
Worms
I gave up on these because my apartment was too warm for them
(temps easily to 80 degrees in the summer even under the sink),
and I could keep them going but never really thriving, whether I used
synthetic sponges or dirt with ice packs in a cooler (and then I
discovered grindals, which do thrive here). Many people who keep
them have cool basements or use a refrigerator or wine cooler set to
about 55 degrees F. Another alternative I just learned about from
Jack Heller is to cut off the lower half of a 2 liter plastic soda
bottle, fill it with water, and freeze it. That block of ice, if
placed in a standard styrofoam fish box, in the middle of a few inches
of worm bedding, will take 2 days to thaw, at which point it can be
replaced with a freshly frozen block of ice. It gets too cold
right next to the ice for the worms, so they hang out a few inches away
from the ice block. They're otherwise cultivated just like
grindals, although some people grow these up on a much larger
scale. Some images of Charles' Harrison's white worms are here.
They are reputed to be fattening, so are not recommended
as a daily dietary staple.
Daphnia
I keep a few going in a set of open trays on a
windowsill--in shallow water, figuring that without filtration or
aeration, my carrying capacity is limited by surface area. I
used to just toss them a pinch of dried brewers' yeast or a bit
of baby food sweet potatoes every few days, and change their water
with aged tank water when I do tank water changes. I did not get
many daphnia out of this--just a few dozen here and there as a treat
for favorite fish. But it kept them going until I saw the
light: during Joe
Fleckenstein's talk on live foods at the 2005 MASI show, he said he
used a little bit of everything he'd heard people used to feed them,
including, most intriguingly to me,
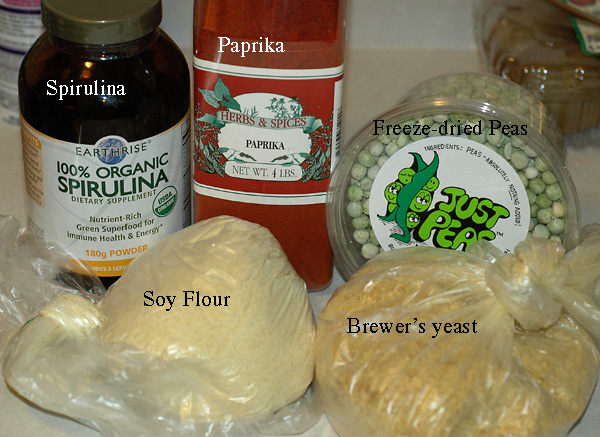
paprika. So I went out and got several things he mentioned--soy
flour, spirulina powder, and yeast from the health food store, a big
jar of paprika from the international grocery, and (my own inspiration,
no blame to Joe) some freeze-dried
peas, also from the health food store. I put all that you see
here together--thats 180g or about 6 oz of spirulina powder, 1 pound of
paprika, a 3.5 ounce container of the peas, about 4 ounces of soy
powder and about 4 ounces of brewer's yeast. Again, the
proportions were simply what I bought of each one, and not specifically
Joe's recipe. I bought a big jar of paprika, so there is a lot of
pepper in my version.
I whirled these together in the food processor (with a towel wrapped
around it to keep from pepper-spraying myself) until the peas were
powdered and all well-mixed. I put it in a spice jar and sprinkle
a bit on the daphnia daily. I have seen an incredible increase in
daphnia yield under this new regimen--so many that I suspect one of my
trays actually crashed from overpopulation because I wasn't harvesting
them fast enough.
Here are happy daphnia in their trays on the windowsill:
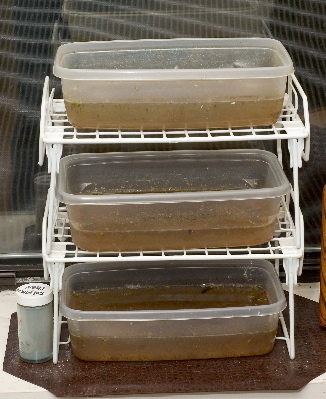
I keep them on the windowsill because it's a handy surface; they have
also done ok in a closed closet for a time. Light is not
necessary. The culture gets mucky on the bottom, but that's ok as
long as it doesn't get stinky.
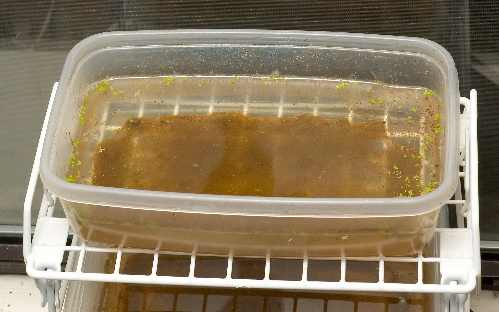
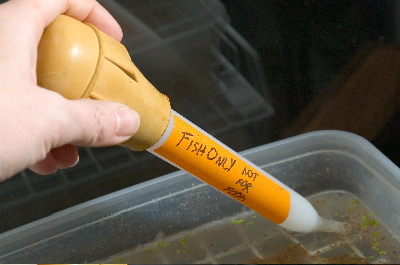
I use a baster to harvest them. You can see how they cluster in
the corners of the tray above. I put the baster there to avoid
the mulm from the bottom of the tray:
And I replace the liquid I remove with water from the tanks, because
they're supposed to prefer to live in aged tank water. I never
give them freshly dechlorinated tap water, only water from my
tanks. They seem to flourish a little more in the water from my
"hard water tanks" which is St. Louis tap water supplemented with a bit
of SeaChem LiveBearer Salt. I top them up at least once a week
with tank water, and
when the culture starts to stink, once every few weeks to a month, I
drain the entire culture into a brine shrimp
net,
along with whatever goop is on the bottom of the box, and rinse it back
into the box with tank water--in effect, doing a 100% water change, but
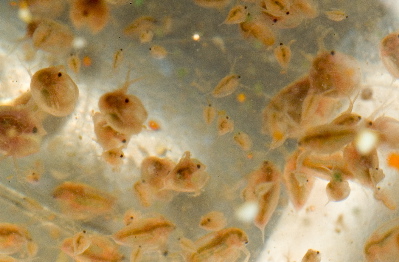
with aged tank water. I think I have daphnia pulex, which are all
caught by the net, but Moina macrocopa (often incorrectly called
Daphnia moina) are preferred by many fishkeepers
because the newly hatched babies are smaller than baby brine
shrimp--great for small fry--but require different feeding techniques
because they will slip through a standard commercial brine shrimp
net.
 .
.
The fish are quite pleased by every feeding of daphnia.
Although in theory they could survive in the tanks for days, they
never last very long before the fish chase down every last one of them.
One neat idea for making the best use of daphnia comes from Jack
Heller, who calls them excellent "babysitters" for young fry. If
you have to be out of town for a few days, putting some daphnia in the
fry tanks helps keep the water cleaner, as the daphnia filter feed on
some of the tank waste, and they also will produce babies that the fry
can eat (assuming the fry are too small to eat the adult
daphnia). Add a couple of ramshorn snails and your babysitting
crew is complete--they will help produce infusoria from the fish waste
that the daphnia will eat.
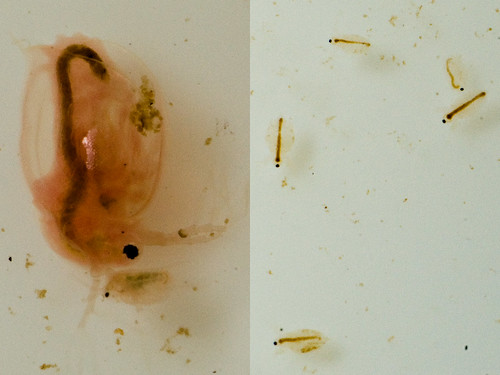
Daphnia vs Moina
Adult Moina, a similar animal from a different genus than Daphnia, are
the size of juvenile Daphnia, and juvenile Moina are smaller than newly
hatched brine shrimp. I recently got another starter culture of
Moina because the very small juveniles should be excellent for fry.
They're so small that they don't have enough density of pigment
in their bodies to appear orange to the naked eye, as the Daphnia do,
and they're about the same size as the cyclops that sometimes
contaminate and can take over neglected Daphnia cultures. But
though the both critters pretty much look just like white dots to my
eyes, Moina swim like Daphnia--jerky short
almost random-walk movements--and the cyclops are supposed to swim in a
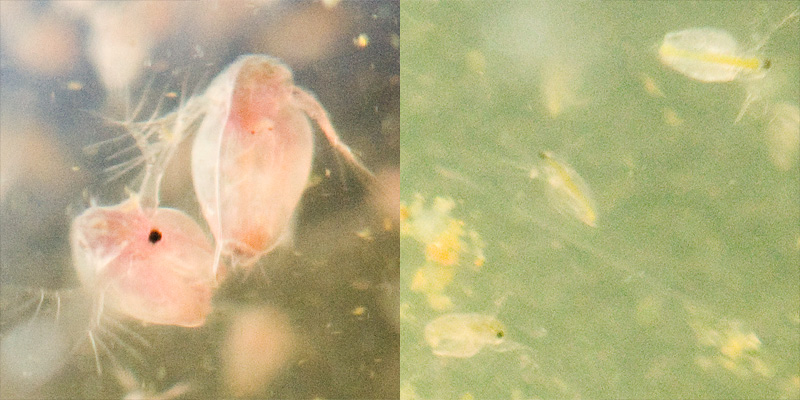
smoother steadier motion. A closer look at the cultures (the
best resolution I can get until I find my macro extension ring for the
camera) reveals that the Moina do look just like juvenile Daphnia, and
up close, they have an orange cast just like the Daphnia.
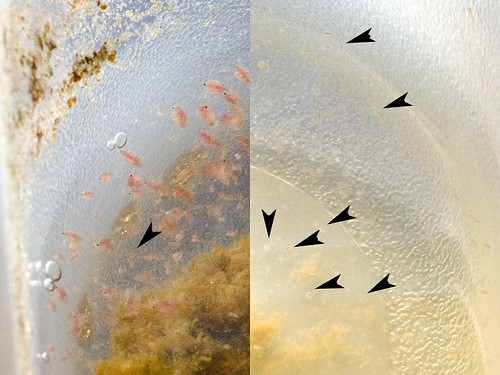
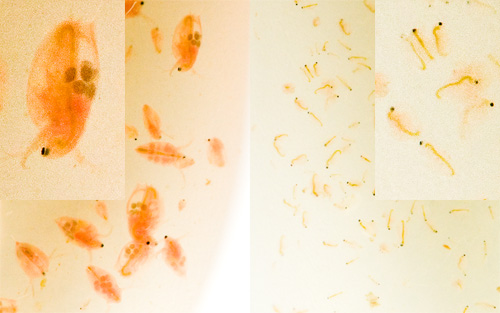
Here are the cultures shot side by side (identical scale: the adult Daphnia are about 2mm long).
The arrowheads point to Moina in the right image--hard to see, of course, but easier to make out if you view the image larger here, and to a similar appearing juvenile Daphnia on the left image.
Here they are in more detail, at the same scale for both the larger images and the inset closeups:
Confused
flour beetles
I keep a few of these in a covered drum bowl in my closet with some
whole wheat flour. They're covered because I don't want them to
make their way to my kitchen and start eating my wheat and flour.

It is not easy to separate the beetles from the flour, so they mostly
sit quietly and unbothered by me in the
closet. Occasionally I grab a strainer and sift a few out
to sprinkle into the tanks, where the fish enjoy the treat. They
need whole wheat flour--white flour doesn't have enough nutrients to
keep them going in any dense, useful quantity. Once I thought I
could cleverly recycle some stale gingerbread cookies made with whole
wheat flour as crumbs for the beetles, but the spices didn't agree with
them and the large crumbs made it harder to separate out the
beetles. That was dumb. They get straight whole
wheat flour only now.
These beetles are well armored, and are best suited as food for larger
top feeding fish. If you dig a little deeper in the flour you can
harvest a mix of larvae and beetles, and the larvae are more appealing
to many fish.

They're called confused because they were confusing to taxonomists
trying to classify their species many years ago, but the beetles are
quite clear about eating and breeding and otherwise doing their thing.
Endler's
livebearer fry
Since I have a few of these fish in most of my tanks, there are nearly
always a few fry available to supplement the diet of the other fish, if
they're hungry enough to chase them down. They're live food
by default, not really by design. This also has the pleasant side
effect of keeping the Endler population under control; they're not
known as "Endless livebearers" for nothing.
Red
Wigglers (earthworms)
I keep a bin of redworms to compost my kitchen scraps.
Occasionally the fish get a treat of some fresh chopped worms.
Recently I tested a rolling vegetable mincer vs my regular cleaver to
see which most efficiently chopped the worms, and the cleaver won hands
down because the mincer was too dull and didn't cut cleanly through the
worms. For just a few worms at a time for my largest fish
(smallish throrichthys cichlids), I just rinse them and pinch them off
between my fingers into 1-inch chunks.
I learned most of what I know about vermiculture from Worms eat my garbage, which is
available here,
and from the forums at HappyDRanch,
from whom I ordered my Can O' Worms. I use Magic Worm Bedding
here too with good success. The bin sits in the kitchen and
doesn't stink.
Snails
My planted tanks produce an abundance of snails, mostly ramshorns, and
when I was keeping goldfish, I’d toss the excess in their tanks,
and
they rarely hit the bottom of the tank before being snapped up.
Loaches also love them (although my present dwarf Sidthimunki loaches
don’t seem to eat them), and so did my adult Thorichthys
cichlids. Many fish that are too small to take on whole snails
will be delighted if you crush the snail shell and toss it back in the
tank.
More
Web Resources
Some good web resources for more information on culturing live foods:
In case you missed the first link, this is where you can get Mike Hellweg's book Culturing Live Foods
The Bug Farm website
discusses which foods for which fish as well as culture techniques
The
American Killifish Association Beginner's guide has a good section
on live foods
The Krib
discusses an extensive variety of live foods
The Live-Foods list is not very active but seems to be pretty good
The Killietalk archives
include many good threads on live foods
Notes from Jack Heller on
live food cultures, including paramecia.
Some images of Charles'
Harrison's live food cultures
Magic Worm Bedding
is available by telephone or mail order directly from the company, but
not yet available directly online.
And, of course, your local fish club is usually a great source of
starter cultures and helpful people who know enough to generate excess
cultures to give you a start.
Return to My Fishroom
Back to Fish Page
Return to Diane's Home Page


 http://debunix.net/fish/CharlesLiveFoodCulture.html#CharlesShrimpHatchery


 .
. 


